Shop My Feed

Saturday 31 March 2012

Blogger Appreciation Award

I'm very excited at the moment as today I received my first ever Blog Award - and I'm thrilled to bits!
I love blogging and to know I'm not the only one who reads it really does make me proud- so thank you to all my new followers and all the comments you leave - !

I was awarded this Blogger Appreciation Award from C Loves Makeup - Thank you!


RULES
- Thank the person who gave you the award by linking their blog in your post.
- answer the following (4) questions
- award the blogger appreciation award to new followers/ fellow bloggies as you like
- let the blogger know you have awarded them


QUESTIONS
1. How long have you been blogging?
2. What are 1-2 reasons why you started blogging?
3. What types of blogs do you like to follow/read?
4. What is 1 thing you would like to improve on as a blogger/on your blog?


ANSWERS
1. I've been blogging since October 2011 (5months)
2. I began blogging due to a university module but once I had finished the semester I continued to blog about things I love and find of interest.
3. I follow nail art, fashion, trend and styling blogs mainly
4. I need to do more outfit posts. I'm quite shy to ask people to photograph me - really need to get used to it.

NOMINATIONS

Congratulations ladies!

x


SHARE:

Thursday 29 March 2012

Nail Art #5 - Patchwork Pastels

I recently saw this nail design on Obession Lacquer blog - I really loved it so thought I'd try it out for myself!

I began by painting two coats of white on my nails - this is to allow to colours on top to show up really bright and pop


Using a sponge, dab a baby blue nail varnish onto your nails in random patterns until your desired look is achieved.


Repeat the same process with a light pink in the white areas ensuring to blend it into the blue. You'll notice the colours mixing and making a purple creating a third colour on your nails (which saves you from having to add in purple later)


As you can see it can get a little messy, so you may want to clean around your nails with a cotton bud soaked in nail varnish remover.


Apply a top coat to protect your design & taadaah!


SHARE:

Myself on Paper

Just a little post today to share with you all this amazing drawing my best friend did of me today. I was absolutely shocked when I first saw this & the fact that he drew this for me - I can't stop thanking him!

Here's the original photograph:


The Drawing:


SHARE:

Tuesday 27 March 2012

Blog Giveaway #1

Hello beautiful bloggers!
Todays the day I have my first ever blog give-away & I'm rather quite excited for it too! (eeek)
My blog has taken off recently with lots of lovely comments and followers, so why not give you a little thank you?

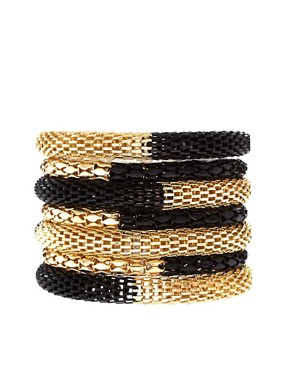
The winner will recive this beautiful bracelet set from ASOS
I always love their jewellery and was almost tempted to keep this for myself (hehe)Image 1 of ASOS Black and Gold Metal Bracelet Pack

To enter all you have to do is follow my blog and comment below with your email address! :)

For extra entries:
Follow my blog on BlogLovin' (+1)
Follow me on Twitter (+1)
(all links can be found on my page link above)

The winner will be announced on the 16th of April
GOOD LUCK!


**I will contact the winner & send the bracelet direct from ASOS to the winners address through ASOS premier so you shall receive it the next working day- I currently do not have these bracelets and if by chance these bracelets are out of stock on the day the winner in revealed I shall allow the winner to choose their own piece of jewellery from ASOS at the same value**


SHARE:

Strawberry Muffins

I spent today playing badminton outside in this gorgeous weather (for about 20mins) then lounging around the house in search of something to do..

I saw some strawberries in my fridge that needed eating before going bad so I decided to make these!


Heres the recipe I used:
375g plain flour
3 eggs
1 tbsp baking powder
450g caster sugar
2 tsp vanilla essence/extract
1.5 cup diced strawberries
250ml milk
125 gms butter at room temperature


Begin by mixing the sugar & butter together until it creams white
Then add the flour (sift) and baking powder then add a little bit of milk in at a time whilst mixing together
Add the eggs and vanilla essence and use an electric mixer to get rid of all those little lumps.
 (a normal whisk should do just fine if you don't have an electric one)
Finally add the sliced strawberries and put into the muffin cases.
Cook at 180 degrees Celsius for 15 - 20 mins

Little tip: get a tooth pick and poke in the centre of the muffin - if it comes out completley clean, your muffins are ready!

And there you have it - strawberry muffins!


SHARE:

Monday 26 March 2012

Nail Art #4 - Gradient Effect

I've been seeing gradient effect nails around a lot recently so I decided to give it a go myself..
For this design all you need is two contrasting colour nail varnishes and a make up sponge.


First of all apply a base coat to protect your nails from the varnish, then apply two coats of nail polish - I've chosen a metallic silver


Once the nail varnish has dried, take an old make up sponge and paint a corner of it with your contrasting nail varnish. Don't soak your sponge in the varnish - one or two strokes should do the trick nicely.
Start from the bottom of your nails and lightly dab the sponge on your nails working your way up slowly so  you have less varnish on your sponge the further up your nail you go.


You may want to start on another nail at the same time if you find you have too much varnish on the sponge so you can achieve the gradient effect your after.


Repeat this step on all nails and wait a few minutes for them to dry.
 Repeat the same process but only concentrate on the tips and middle of your nails and blend into the gradient.

This is a little messy, so you may want to clean around your nails with a cotton bud dipped in nail polish remover.

once your nails are dry - apply a top coat to protect your design!


x


SHARE:

Saturday 24 March 2012

Today I'm Wearing #2


Pink Denim Waistcoat - New Look
Pleated Floral Skirt - Oasis
Belt - Vero Moda
Shoes - New Look
Pocket Watch Necklace - Ebay
Bracelets - Links of Lonon, Shamballa & Friendship bracelet from Brazil
Nails - Gosh & Barry M
Lips - Loreal: Shocking Pink 202


What lovely weather we had today! For the first time this year I was able to step outside without a cardigan - it felt great!
I loved being able to wear something layered out of choice & not because I needed to keep warm. This little waistcoat of mine has been one of my fave wardrobe pieces since last summer as it seems to go with everything and is perfectly lightweight, so can even be worn during those hot & sweaty days. The skirt I stole from my sister about 4months ago & just never returned, along with several other items and took them to Leeds with me for during term time, yet I still have them all now I'm at home :)
So today I went clothes shopping with my Mother & Sister for my cousins wedding (which is next week eeeek). I've now found all my outfits and can't wait to get all dressed up! I always forget how much I love weddings (mainly the food - nom). I'll do some outfit posts of what I wore on the wedding in a few weeks, so keep posted! 


SHARE:

Inside My Bag


My bag holds my life & without it  I'd most certainly be lost, which girl wouldn't? I've had this Fossil bag for about 6 months now and its so convenient!

So here we have:
Blackberry- Its actually broken (poor phone) but I'm getting a new one on Monday! Wahooo!

Pukka Pad - I've not taken this out from when I had my university lectures before Easter break, but you never know when it will come in handy!

Purse - Bought from TKMAXX for £10 and holds about a zillion things, best purse I've ever bought!

Ipod - As I don't have a car, my ipod accompanies me on all those little walks to & from uni. 
I love my ipod sooo much!

Terrys Choc Orange - for those peckish moments

Comb - for those emergency moments!

USB pen - Its actually not mine, but my sisters hehe

Keys - house & university lock key to keep all my precious bits and bobs safe

Lip Balm, Pink Lipstick & Max factor lip pen - the lip balm is self explanatory really, the pink lipstick is my emergency/backup lipstick i carry around if I've ever forgotten to take out the one I'm actually wearing that day (god forbid) and the Max factor pen was what I was wearing that day.

Pens - A girl always has a pen in her bag, it's simply incomplete without one (or two)

Pins - I also forgot to take these out from my bag after a practical I had at uni hehe

Paracetamol - same as the above really :)

Umbrella - I always carry an umbrella as I hate getting caught in the rain and April showers are almost upon us!


What do you have in your bag?


SHARE:

This Weeks Top Picks #2

river island spring summer lookbook 2012 marie claire 
River Island new collection contains a large variety of pastel shades. I fell in love with this powder pink, although I personally wouldn't pair pink with pink as I'm such lover of my dark shades, but this works really well! Almost well enough to make me want to go out and buy these shorts!

French Sole ballet pumps, £82 - spring shoes - spring footwear - accessories - fashion - shopping 
French Sole Ballet pumps would look super cute with the above outfit if you wanted to keep to the pastel trend. 

Topshop leather brogues, £32 
These TopShop Brogues are quite cute for spring. I personally love the contrasting shades of orange, we don't see enough orange shoes!

Aztec Print Playsuit 
Topshop Aztec print playsuit. I'm obsessed with Aztec print at the moment and was drawn towards this white playsuit, even though I never wear white! Whats wrong with me recently?

Missguided Henrin tribal drop earrings, £5.99 - 60 Best Spring Accessories - Spring Accessories - Marie Claire - Marie Claire UK 
I would pair these earrings with the above playsuit to bring a little colour to the outfit, they're from Miss Guided!

High Waist Lilac Lace Shorts 
Topshop lilac high waisted lace shorts - perfect wear for when it gets warmer to show off those pins!

KG Kurt Geiger printed sunglasses, £60 
I'm in love with these Kurt Geiger cat eye sunglasses!


I've been doing a lot of online 'window' shopping recently as I'm a broke student until my next loan comes in next month (wooohooo!)
So until then I'm afraid I am just having to browse and lust after everything, although its probably for the best as my wardrobe at university seems to be bursting at the seems! eeeeek!


x


SHARE:

Friday 23 March 2012

DIY #2 - Friendship Bracelets

I may be slightly late with this little craze (hence the name of my blog) but I've been teaching myself how to create Friendship bracelets.

After the craze of 'scubbies' in secondary school, I found I was really good at creating little bracelets and had the patience for these type of things and decided to have a little go.

So I raided my mothers sewing cupboard & found a bag full of embroidery thread (this is what you use to create the friendship bracelets with) & started experimenting..

Here's my first attempt..
Not the greatest thing ever, but hey, I'll get better!

Once I've mastered this art I'll post a tutorial, but until then here's the video I found really helpful!


Have you tried making Friendship Bracelets...?


SHARE:

Lovin' #1


Sheer cream top - Topshop
Beetle Juice Leggings - Black Milk Clothing
BOY of London Leggings - Leavetheboyalone.com

I've been attracted to very different and unusual styles recently - and I quite like it! I've been bored of my clothes recently & have been trying to change them up and customise them, but I'm still not satisfied. So during my hours of scrolling through blogs and online 'window' shopping I came across these!
the Topshop top is a very simple yet chic little number that can dress up a simple pair of shorts, as I'm always in need of new tops and I don't own any!
I absolutley LOVE these beetlejuice leggings! They've been around for about a year now on Black Milk and are now sold out but I still want/need them! Boohoo and other high street stores have copied the style - so I could just go & buy a pair from there but its just not the same :(
BOY London is making a come back due to Rihanna and Jessie J being seen sporting their clothing - but I've been after a piece of BOY clothing for well over a year now, and thanks to these celebs prancing around in them, theyre becoming more available! I've seen a BOY body I totally want but can't seem to find it anywhere, so I guess these leggings will have to do! (I think I can totally rock them out though)

If I ever eventually have any money & able to purchase any new items I'll do a post to show case!

x


SHARE:

Thursday 22 March 2012

Product Review #1

Anyone that knows me should know that I am completely obsessed with lipsticks! 
I own over 12 shades of bright pinks and reds & I never leave the house without it.. The only problem is my friends absolutely hate when I give them a big sloppy kiss & then they're left with lipstick stains all over their face. Whoops!

So I tried out Max Factors Lip tint pen in shade 06 & fell in love! Its almost lip a felt tip pen which you draw on. It transforms your lips into a bright red pout - & I can't stop raving about it to everyone - and best of all it doesn't rub off!

I apply it once at the start of a night out, and top it up slightly from where it has come off due to eating/drinking!

Although word of warning, if your having a dry/cracked lip moment I wouldn't recommend wearing this, as the colour sticks more to dryer areas of skin and can look slightly messy.

My maXfactor lip pen ♥ 


£7.99 
*3 for 2 at Superdrug plus student discount*


SHARE:

Wednesday 21 March 2012

Nail Art #3 - Block Colour

Block colour & pastel shades are one of my favourite trends this season, but as I tend to shy away from light colours in clothing, I decided to transform my nails instead.

Begin by painting your nails a base colour of your choice (preferably a light-ish shade). I've chosen to do alternative nails in a Barry M powder blue & Gosh baby pink, but you can stick to one!

Paint sections of your nails in diagonal strokes in the alternate colour your have chosen (I have done the alternative pink on blue & blue on pink).

I did this free hand and found it quite easy, but if you are struggling to get a straight edge, use masking tape to section your nails and then peel off carefully after a few minutes - it leaves a beautiful straight edge finish.

Finally, add black triangles in peculiar directions and in-between any of the two panels you have created to hide uneven edges if necessary.


Use a cotton bud to tidy around the edges & use a top coat to protect your design!

x


SHARE:

Tuesday 20 March 2012

Nail Art #2 - Cupcake


Today I will be teaching you step by step how to get these really cute cupcake design nails! - don't fear, they're really easy to do!

1. start by painting your nails with a base coat to protect your nails from the polish.

2. choose a bright colour which will stand out - pinks work really well - and use this colour for the base colour of your design. For each nail you want the cupcake design on - do a manicure strip at the bottom of your nail (this will look like the cupcake case).

*wait for nails to dry completely*

3.  using a nail pen or striper, paint stripes down your nails - choose a colour that will compliment your base colour and stand out!

Now the Cupcake design..

4. using a dotting tool, paint three dots close together at the top of your manicure striped nail (almost like your drawing the top of a cloud) and then fill in the top of the cupcake with a semi circle.

*wait for this to completely dry*

5. using a smaller dotting tool - add a little love heart candy on top with a few pink sprinkles for detail!

Try using gems for the sprinkles instead for a more glam look!

6. Apply a clear top coat to protect your design!

x


SHARE:

Wednesday 7 March 2012

Nail Art #1 - Tiger Print

I've gained a slight new obsession recently - Nail Art
I've always been the type of girl to have painted nails and to experiment now & then with different ideas, but recently I've been stepping it up a notch!

For those of you who don't know, my last name Sher, actually means Tiger.. So when I saw a tiger print design I went crazy & just had to do them - & it's really easy!


1. Begin by applying a base coat. This stops your nails from becoming damged from wearing too much nail polish!

2. paint all your nails white - 2 coats should do the trick!

*wait for nails to dry*
3. Dab a few blobs of orange nail polish onto a paper plate. Take a make up sponge, and dab it into the polish slightly and sponge onto the tips of all your nails.

*be light handed with this and work from the tips up, as you want a gradient effect*

4. Take a black striper and sweep lines onto your nails from to create the tiger print!

5. Apply a clear varnish over the top when completely dry to protect your design.

& there you have it, Tiger print nails in less than 15mins!


SHARE:
NEW IN MY WARDROBE

© FASHERNABLY LATE

This site uses cookies from Google to deliver its services - Click here for information.

Blogger Template Created by pipdig