Shop My Feed

Friday 14 September 2012

Early Birthday Treats


Shirt - Vero Moda
Leggings - American Apparel
Shoes - Little Boutique
Earrings - Asos & eBay
Eagle ring - Asos 
Above Knuckle Ring - eBay
Necklace Pendant - eBay


I didn't actually wear this outfit out anywhere, and it's far too overdressed for the day time - I just really wanted to show you these beautiful heals my wonderful Mother got me as an early birthday treat! Now I'll never be able to afford the real Jeffrey Campbells, and my other suede version are pretty worn out, so when I saw these little beauties I just had to have them as replacements! They're honestly the comfiest style of heal to walk/dance/run/party in, & if you don't already own a pair, I highly suggest you run out & buy a pair as they're so versatile and go with almost anything!

I also bought this studded chiffon shirt a few weeks ago from Vero Moda but just haven't gotten around to doing an outfit post with it on! Its become a staple item in my wardrobe, and has come in handy literally so much since I bought it, such an investment - I love it!

I've also been thinking about opening a little online jewellery shop & wanted to hear your feedback before I did so. I made this little Hamsa Hand pendant necklace, and a few other items which I'll be posting about over the next few days. Yay or Nay, you guys tell me please!

I've had a busy couple of days and more still to come as I head for my approach back to Leeds for my third & final year at university, eeeeek, getting so old!
SHARE:

Monday 10 September 2012

Oh so soft!

Jacket - TkMaxx
Playsuit - Asos
Boots - Peacocks
Belt - Vero Moda

I wasn't planning on buying anything new for a while as my funds are extremely low but a spontaneous trip to TkMaxx resulted in falling in love with this beautiful cream faux fur jacket! I've already been a huge fan of fur jackets, and each year I stand in the mirror trying them on and drooling over them but could never afford the hefty price tag that came with it! Luckily, I managed to find this one for just £25! I can finally say I have a fur coat for my winter wardrobe!

I also managed to pick up these cute little boots from Peacocks on sale for just £7! I really think that place is underestimated, as you can't really complain for that price, and they're super cute - I haven't worn anything else on my feet since buying them! I think I'm being super prepared for winter this year! What can I say, I hate being cold!


SHARE:

Sunday 9 September 2012

Nail Art #13 - I Want Candy


First of all I would like to apologise do the lack of pictures and layout of this post as I'm doing it from my iPhone as my laptop is in repair (boohoo) and the blogger app is not very sophisticated in terms of adjusting all the nitty gritty things that my OCD makes me do, however hurrah for spellcheck!

Anyway, I saw a nail design on Instagram which was full of horizontal stripes and was so colourful that it have me inspiration to do my own version! So here's how I did it, it's a lot simpler than it looks I promise!

1. Begin by using a base coat to protect your nails

2. Use a base colour and paint two coats for a strong colour, I used orange.

3. Chose around 3/4 colours (nail stripers or use dotting tools/paint brush) and begin by using your first colour to paint horizontal stripes across your nails.

Now this is the beauty of this design, as you can really do it how you like, just add more and more stripes with different colours. You don't need to wait for each stripe to dry as even when the colours touch, they just blend together but don't run into each other!

4. I used my white striper as my last colour to highlight in certain areas an made sure the stripes were much thinner than the coloured stripes.

It really is that easy!

Once again, really sorry this isn't a great tutorial and isn't a picturesque as my other tutorials! I'll make it up to you, I promise :) x

INSTAGRAM::fashernably_late


SHARE:

Monday 3 September 2012

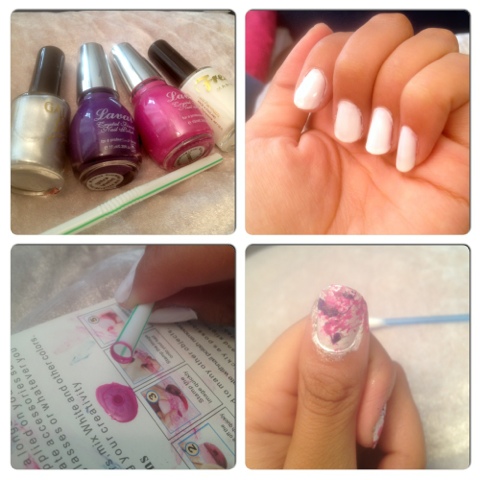
Nail Art #12 - Paint Splatter

This nail tutorial is really easy to do & requires no tools other than just a straw, yes a straw! All you need is a base colour and 3 bright and complimenting colours for the design. This nail tutorial requires a little mess making, so make sure you have something to protect the surface our using from any flying polish!


1. First take a basecoat and apply this to your nails to protect them.

2. Paint two coats of white polish onto your nails (or what base colour you choose)

3. This next section can get quite messy so lay down something to protect your surface, I used an old magazine.

4. Take your first chosen colour (I used purple for this) and paint a few dabs of colour onto the bottom of your straw, make sure you don't apply too much as this can cause huge blobs of colour on your nails. It's best to use just a small amount as you can build up to your desired effect as you go along.
5. Place your nail about 5cm away from the straw and blow into the straw. Short sharp bursts achieve the best results.

6. Continue this on all of your nails with your desired colours.

7. I used a silver at the end to add a slight sparkle to my design

8. Finish by using a topcoat to protect your design and add a beautiful shine!


Hopefully you didn't make too much mess whilst using this tutorial, but it really does achieve a great design! Please feel free to show me your own designs!


SHARE:
NEW IN MY WARDROBE

© FASHERNABLY LATE

This site uses cookies from Google to deliver its services - Click here for information.

Blogger Template Created by pipdig