Shop My Feed

Thursday 26 April 2012

I'm In Love

Image 1 of ASOS DENY Wedge High Top Trainers With Suede Detail

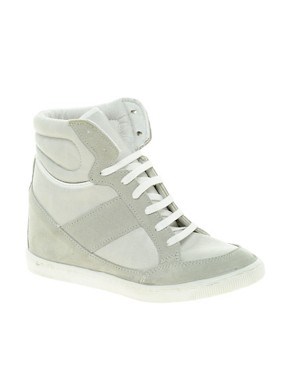
I've been seeing these High Top wedge trainers around for a while now & I was very undecided how I felt about them as I'm not a 'trainer' kinda gal.. I've seen the Topshop & Boohoo versions, and was seriously considering buying them as I think they'll look super cute paired with some high waisted denim shorts and a crop come warmer weather or even on a casual night out. I then saw these real leather grey panelled ones from Asos & just had to buy them! They're similar to the other versions I've seen, but yet different in so many ways. For starters I have a weird obsession with grey so that instantly made me want them. Two, the panels across are more discreet and cuter. They arrive tomorrow & I can't wait to wear them! I'm just dreading wearing them out for the first time, I may just have to walk around on my hands all night so they don't get dirty!


SHARE:

Monday 23 April 2012

Today I Bought #3


Black Leather Quilted jacket - Zara
Denim Jacket - Primark
Earings - Primark
Sandels - Primark
Belt - H&M

I decided to head on into town today as I haven't done any actual shopping trip for ages! I usually just buy from ASOS because I love the fact it gets delievered straight to your door and its free returns! Well anyway, I've been needing a few things for summer (if we actually have one) and spotted these great little finds today, mainly from Primark! I've been after a denim jacket for a good year or two now, and I really don't know how I've lasted this long without one, so when I saw this I snapped it up straight away - an essential if I must say so! I absolultey love the leather jacket I picked up from Zara too, but in two minds whether to keep it or not as I've never owned a leather jacket before, it seems silly to return it! But, the weather will no doubt pick up, so I'm afraid it will get stuffed in the back of my wardrobe until Autumn! Dilemmas!

I'm having a clear out of a few things in my wardrobe which I just never seem to wear and will be selling them on here! Most things still have the tag on or have only been worn once for a few hours.. so keep an eye out to grab yourself a bargain!


SHARE:

Sunday 15 April 2012

Nail Art #8 Ciate Caviar Manicure


So last night I tried out my own version of the Ciate Caviar nail manicure & I'm personally not raving about it even though it looks really different and edgy. I'll get to the pros and cons in a little while but first I'll tell you how I did it. Obviously as you can see, the beads I've used are not the Ciate ones, as I bought a little pack of purple and denim mixture of beads for £1.99 on Ebay here. I was literaly so excited when they arrived that straight away I got my little nail polish box out and started to decide what colour polish to use. I choose  to use white for the purple beads and a Barry M duk blue for the denim mix beads. I then followed the Ciate instructions and did two coats of varnish and applied the beads whilst the second coat was still wet and pressed them down to secure the beads. I was really chuffted with the result and continued to finish of the rest of my nails. I didn't apply a top coat as it dulls the bead design, so I just used it on the very tips of my nails instead.


(I have realised that these micro beads I ordered are far larger than the ones used in the actual caviar manicure! 
which may be the reason for many of my cons - sorry for the late realisation)

Tips
  •  Use a thick nail polish and not a cheap one which might be thinner as it won't hold the beads very well
  • My beads came in a little bag so I dipped my nail in the bag rather then sprinkling the beads over the top as the Ciate instructions suggest.
  • I would probably only do it on one nail next time rather than all of them

Pros
  • It looks really nice once all the nails are done
  • Its a very different nail manicure which is going to stick around for a while

Cons

  • The manicure it self only lasts under 1 day. The beads fall off very quickly and it looks patchy almost straight away
  • The nail polish takes a lot longer to dry as not as much air gets to them as usual which leads to my next point...
  • It can be a little messy, as I ended up with tiny beads all over the place (mainly from ones that fell off my nails after I had finished applying them as they take a while to dry)

Overall I really like the Ciate Caviar manicure idea, and although I have not used the real Ciate Caviar manicure, I'm sure it will have the same pros and cons list as my own little version unless their nail polish is like super glue haha.

Have you tried the Ciate Caviar nail manicure yet?


SHARE:

Friday 13 April 2012

Product Review #2


I have a big love of high voluminous hair and I'm always spending ages back combing it to get some sort of volume but unfortunately I'm a huge sufferer of flat lifeless hair. It just never seems to stay in at the roots- until I discovered this! The first time I discovered this little genius product was a few years ago at the hairdressers & I've been on the hunt for one ever since. This Tresemme hair plummping powder is one of many volumising hair products our there on the market, but only costs a fraction of the price compared to many of the other products I've seen (hence the reason why I haven't tried one of them out before now). To use the product you just simply seperate your hair where you would normally start to back comb your hair and sprinkle a little of the powder over the top. It instantly stiffens your locks which makes the back combing stay in longer! I absolutely love! It's also easy to comb out of your hair too!

I bought this from Superdrug as they have an offer at the moment: buy 2 for £6.99 or £6.50 each 

(I obviously took advantage of the offer)

Luckily I had enough points on my beauty card to buy these with 10% off!
Don't forget Superdrug offer 10% off with an NUS extra card!

Happy back combing!


SHARE:

Thursday 12 April 2012

I love Organising


With my recent obsession with nail art recently, my collection of nail polishes have grown massively - so, it was only time to sort it all out and arrange it all nice and neatly as my little make up bag was overflowing and tearing at the seems. I remembered my sister had this cute little case which she never used so I stole it from her (with her knowledge of course). I can say I'm quite proud of how cute it looks!

I wish I had much more money than I do so I could buy all the Barry M, Gosh, O.P.I & Ciate colours in the world, but unfortunately my status of 'broke ass student' has not yet and will not change in the near future. But, saying that, my nail designs don't look too shoddy seeing as though most of my nail polishes are either Rimmel, a few Barry M's I purchased in the ASOS sale, Avon (which are amazing and I 100% recommend when they're on offer for £2.40 each) and a mixture of other smaller brands which I bought for about a £1, showing you that you don't always need the top brands to have amazing nails!

The bottom right image shows all my stripers (nail art pen) colours I own. I bought them off Ebay for around £12 for 24 colours - and they're amazing. Unlike the typical nail art pens which are more dominant around Ebay, these are just the striper without the pen as I've bought the pen/striper combo ones before and found the nips on the pens constantly clog up or just don't work at all!

I also bought the nail gems for £1 off Ebay - and some nail dotting tools for £1 (not photographed due to bad camera sorry). But you can make your own dotting tools from things around the house such as a bobby pin or tooth pick

Hope you like my nail polish collection - what's yours?


SHARE:

Tuesday 10 April 2012

D.I.Y #3 Cut Out Skull Tee


So I've been toying with the idea of making my own cut out skulls tee for a while now as I've been seeing them on Tumblr quite a bit, but I wanted it to be a little different as I hate copying straight out, I always like to put a little touch of my own on things. So today I just got up and started making this & I'm pretty proud of it myself I must say!

I used an old Vero Moda bat wing top I bought years ago & just never seem to wear anymore as my style has changed dramatically since I bought this!


So I began by folding my tee in half and marking out where I wanted to cut the sleeves. As this was a batwing top the arm holes would have to be quite large, but luckily this is the look I was going for anyway.
I then cut along the line making sure I was cutting both arms as I wanted them to be equal and this is the best way to do it.


I then drew out my skull design. I choose to have unusual teeth as all the other cut out skull tee's i have seen have very dodgy square teeth & I really didn't like it. 


I then finally cut out my eyes, nose and teeth & then spent hours applying the little gems around the outside of the skull.

Please show me any DIY skull tops you've made, I'd really like to see!
Happy skulling! x


SHARE:

Today I Bought #2


Three Gold Bands £4
Multicoloured Jewelled Cube £3
Eagle £3

Spending whole days browsing Tumblr, online 'window' shopping and reading other blogs certainly makes you want to buy everything in the world doesn't it? Well, for me it does anyway, and that's how I lead to buying these..
I've noticed I seem to be lacking in the jewellery department of things as I've not really updated my jewellery collection for a good year or so, and the one thing screaming out to me from browsing all these blogs were rings. I used to have so many nice little rings, but they're all either so old that they turn your finger green, too big (as I have ridiculously skinny fingers) or massive flower/jewelled rings which were fashionable about 4 years ago. So, it was definitely time to invest in some more up to date stylish rings and I managed to grab these three rings from ASOS in the sale (& they were all size small - double bargin!)! I particularly love the multicoloured cube as its so different and definitely eye catching, I can't wait to wear it out! I've also seen some vintage three finger rings on Ebay which I'm keeping my eye on to buy at a later date..
 (student loan next week - hehe)


SHARE:

Sunday 8 April 2012

Lovin' #2


Envelope clutch bags seem to be everywhere at the moment - an with their classic yet elegant style there's no wonder they're sticking around for a while. I've been on the hunt for a new clutch but couldn't seem to find one that was versatile enough to wear with most of my outfits (as I'm trying to be more of a 'capsule wardrobe' type person). All recent designs seem to be striped, neon or in pastel shades which I find quite annoying as come winter it will be sitting in the back of my wardrobe for years. Then my sister showed me this bag she bought from Boohoo for £18. I fell in love with it straight away as the tiny skull tilling effect is very discreet yet gives it an edge and allows room for giving different looks to different styles and outfits.

I shall be borrowing this from my sister a lot come summer - I am a student after all..

Tip: Boohoo have started doing 10% student discount for NUS extra cardholders :)


SHARE:

Saturday 7 April 2012

Nail Art #7 - Cling Film

All you need for this nail tutorial is two colour nail polish colours and some cling film.

Start by applying a basecoat to your nails to protect them from the varnish. 
Then apply two coat of your nail polish and wait to dry


Prepare your cling film by tearing off about 6cm and scrunching it into a ball.
Then paint one coat of your second colour onto your nails and whilst wet (do this straight away or it wont work) take your cling film and dab lightly all over your nail to create this effect.

Tip: do each nail individually 


Apply a clear topcoat to protect your design & your done!


I used a silver polish to create a metallic look. 

*Try pastel shades for an on trend look*


SHARE:

Sunday 1 April 2012

Nail Art #6 - Super Stripy

This is a really easy design to do if you struggle with nail art - all you need is nail art pens!

First paint a base colour of your choice after you have appled a base coat to protect your nails.


Begin by painting one stripe now your nail (anywhere will do, I just opted to start on the side)
Do this on all of your nails


Choose a different colour and paint next to your first stripe. Do this on all nails and repeat the process until your entire nail is full of stripes!


Using a glitter allows for your base colour to pop through - and you can leave gaps in your stripes for it to show through too!


Finally - add a top coat to protect your design!


(sorry these are a little messy due to having to finish them off in a rush)

x


SHARE:
NEW IN MY WARDROBE

© FASHERNABLY LATE

This site uses cookies from Google to deliver its services - Click here for information.

Blogger Template Created by pipdig