Shop My Feed

Saturday, 1 December 2012

Ice Ice Baby


Firstly, I have to admit, these nails turned out by accident! I was going for something along the lines of 'festive nails'  but didn't plan for them to look like this.. and it just so happened that the white basing I chose made my nails look like icicles.  Either way I'm pretty happy these accidental ice nails turned out the way they did, 'cause I think they look super cute, don't you? Well let me get started on telling you how I went about doing this, its pretty easy and perfect for those of you who don't have a steady hand; it's all about messy uneven lines anyway (amazing).

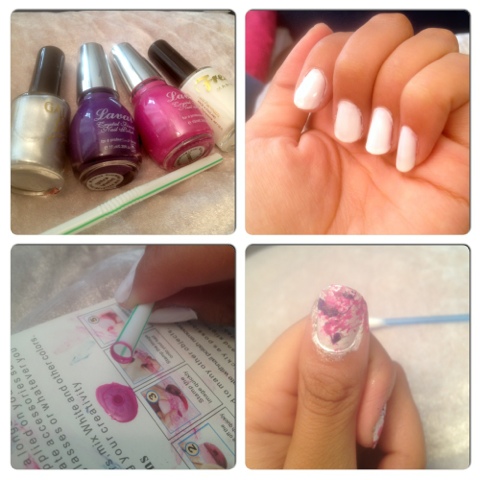
1. Begin by using a basecoat to protect your nails from the polish. I've also been using a 'strong results' treatment on my nails before the basecoat recently, which has really helped my nails from breaking , so if you suffer from this also, I highly recommend it!

2. Paint two coats of polish onto your nails, any colour works for this I guess, as long as you choose colours that compliment one another for the icicle part.

3. Take a white striper, and begin to do quick fast strokes up the nail to about half way starting from the tip of your nail. Make sure majority of your tip is fully covered in white or the colour you put on top won't 'pop' as well as it should.

4. Ensuring your white has fully dried, repeat the process with your second striper (for me, Silver) but this time, only go up the the a 1/4 of the way so the white is still visible.

5. Do another coat of Silver, but only on the very tips of your nails to darken the colour.

6. To finish off the design, add small dots of glitter in random places, top of with a clear coat & enjoy your icicle nails! Simple!

If you'd like any other festive related nail art, please do feel free to suggest any!
Hope everyone had a lovely chocolate in their advent calender.


SHARE:

Monday, 5 November 2012

Nail Art #14 Seeing Spots


I've been quite busy lately, so spending time on my nails has been pushed to the back of the queue which has therefore lead to lack of nail art posts (sorry guys). I needed a break from my dissertation work last night, and was in the mood to paint my nails and settled on doing this cute little spotty design, I feel its quite fitting for bonfire night also!

How to get this look:

1. Paint your nails with a basecoat to protect them from the polish.

2. I used a pale pink shimmery polish as my base. You can keep your nails clear if you like or choose a darker polish to do this with. I wanted just the spots to be my main focal point.

3. Choose a base colour for your spots. I used this Barry M deep purple colour. I took a small piece of sponge and dabbed it on 1/2 of my nail in varies places. I needed to coats of this.

4. I then selected random colours, not all of which I though complimented each other, but colours that would stand out against the purple and even clash!

5. I used various different sized dotting tools and dipped the end into some polish and began spotting away!

6. I used a white polish last and a small dotting tool to just brighten up my design a little.

7. Finish off with a clear polish to protect your design!


Don't forget to enter my giveaway HERE for your chance to win a Yves Saint Laurnt Lipstick!
Good luck x

SHARE:

Friday, 14 September 2012

Early Birthday Treats


Shirt - Vero Moda
Leggings - American Apparel
Shoes - Little Boutique
Earrings - Asos & eBay
Eagle ring - Asos 
Above Knuckle Ring - eBay
Necklace Pendant - eBay


I didn't actually wear this outfit out anywhere, and it's far too overdressed for the day time - I just really wanted to show you these beautiful heals my wonderful Mother got me as an early birthday treat! Now I'll never be able to afford the real Jeffrey Campbells, and my other suede version are pretty worn out, so when I saw these little beauties I just had to have them as replacements! They're honestly the comfiest style of heal to walk/dance/run/party in, & if you don't already own a pair, I highly suggest you run out & buy a pair as they're so versatile and go with almost anything!

I also bought this studded chiffon shirt a few weeks ago from Vero Moda but just haven't gotten around to doing an outfit post with it on! Its become a staple item in my wardrobe, and has come in handy literally so much since I bought it, such an investment - I love it!

I've also been thinking about opening a little online jewellery shop & wanted to hear your feedback before I did so. I made this little Hamsa Hand pendant necklace, and a few other items which I'll be posting about over the next few days. Yay or Nay, you guys tell me please!

I've had a busy couple of days and more still to come as I head for my approach back to Leeds for my third & final year at university, eeeeek, getting so old!
SHARE:

Monday, 3 September 2012

Nail Art #12 - Paint Splatter

This nail tutorial is really easy to do & requires no tools other than just a straw, yes a straw! All you need is a base colour and 3 bright and complimenting colours for the design. This nail tutorial requires a little mess making, so make sure you have something to protect the surface our using from any flying polish!


1. First take a basecoat and apply this to your nails to protect them.

2. Paint two coats of white polish onto your nails (or what base colour you choose)

3. This next section can get quite messy so lay down something to protect your surface, I used an old magazine.

4. Take your first chosen colour (I used purple for this) and paint a few dabs of colour onto the bottom of your straw, make sure you don't apply too much as this can cause huge blobs of colour on your nails. It's best to use just a small amount as you can build up to your desired effect as you go along.
5. Place your nail about 5cm away from the straw and blow into the straw. Short sharp bursts achieve the best results.

6. Continue this on all of your nails with your desired colours.

7. I used a silver at the end to add a slight sparkle to my design

8. Finish by using a topcoat to protect your design and add a beautiful shine!


Hopefully you didn't make too much mess whilst using this tutorial, but it really does achieve a great design! Please feel free to show me your own designs!


SHARE:

Thursday, 30 August 2012

Nail Art #11 - Zebra Stripes


This is a really easy and cute nail tutorial and it literally takes about 15 minutes! Animal prints for nail designs have been around for a while now, looks like people just can't get enough! I'm going to be telling you how to achieve this design using just a nail striper!

1.  Use a basecoat to protect your nails from the polish

2. Use a Matte polish as a base and apply two coats, if you can buy a matte topcoat and apply it over the top of any varnish to dull the shine if you don't have any matte polishes. (You don't have to use a matte polish, but the shine and contrast off the silver looks more dramatic)

3. To create the Zebra stripes I pulled up an image off Google to get the pattern correct. It's mainly just triangular patterns with lines inbetween.

4. Clean up around your nails using a cotton bud dipped in polish remover.

5. If you've used a Matte polish, don't add a topcoat or it will add a shine and detract away from the contrasting colours.


Experiment with all sorts of colours and animal prints! Using a Matte black polish and a black striper has a really cute and subtle effect!

INSTAGRAM: SABINASHER


SHARE:

Sunday, 1 April 2012

Nail Art #6 - Super Stripy

This is a really easy design to do if you struggle with nail art - all you need is nail art pens!

First paint a base colour of your choice after you have appled a base coat to protect your nails.


Begin by painting one stripe now your nail (anywhere will do, I just opted to start on the side)
Do this on all of your nails


Choose a different colour and paint next to your first stripe. Do this on all nails and repeat the process until your entire nail is full of stripes!


Using a glitter allows for your base colour to pop through - and you can leave gaps in your stripes for it to show through too!


Finally - add a top coat to protect your design!


(sorry these are a little messy due to having to finish them off in a rush)

x


SHARE:

Thursday, 29 March 2012

Nail Art #5 - Patchwork Pastels

I recently saw this nail design on Obession Lacquer blog - I really loved it so thought I'd try it out for myself!

I began by painting two coats of white on my nails - this is to allow to colours on top to show up really bright and pop


Using a sponge, dab a baby blue nail varnish onto your nails in random patterns until your desired look is achieved.


Repeat the same process with a light pink in the white areas ensuring to blend it into the blue. You'll notice the colours mixing and making a purple creating a third colour on your nails (which saves you from having to add in purple later)


As you can see it can get a little messy, so you may want to clean around your nails with a cotton bud soaked in nail varnish remover.


Apply a top coat to protect your design & taadaah!


SHARE:

Monday, 26 March 2012

Nail Art #4 - Gradient Effect

I've been seeing gradient effect nails around a lot recently so I decided to give it a go myself..
For this design all you need is two contrasting colour nail varnishes and a make up sponge.


First of all apply a base coat to protect your nails from the varnish, then apply two coats of nail polish - I've chosen a metallic silver


Once the nail varnish has dried, take an old make up sponge and paint a corner of it with your contrasting nail varnish. Don't soak your sponge in the varnish - one or two strokes should do the trick nicely.
Start from the bottom of your nails and lightly dab the sponge on your nails working your way up slowly so  you have less varnish on your sponge the further up your nail you go.


You may want to start on another nail at the same time if you find you have too much varnish on the sponge so you can achieve the gradient effect your after.


Repeat this step on all nails and wait a few minutes for them to dry.
 Repeat the same process but only concentrate on the tips and middle of your nails and blend into the gradient.

This is a little messy, so you may want to clean around your nails with a cotton bud dipped in nail polish remover.

once your nails are dry - apply a top coat to protect your design!


x


SHARE:

Tuesday, 20 March 2012

Nail Art #2 - Cupcake


Today I will be teaching you step by step how to get these really cute cupcake design nails! - don't fear, they're really easy to do!

1. start by painting your nails with a base coat to protect your nails from the polish.

2. choose a bright colour which will stand out - pinks work really well - and use this colour for the base colour of your design. For each nail you want the cupcake design on - do a manicure strip at the bottom of your nail (this will look like the cupcake case).

*wait for nails to dry completely*

3.  using a nail pen or striper, paint stripes down your nails - choose a colour that will compliment your base colour and stand out!

Now the Cupcake design..

4. using a dotting tool, paint three dots close together at the top of your manicure striped nail (almost like your drawing the top of a cloud) and then fill in the top of the cupcake with a semi circle.

*wait for this to completely dry*

5. using a smaller dotting tool - add a little love heart candy on top with a few pink sprinkles for detail!

Try using gems for the sprinkles instead for a more glam look!

6. Apply a clear top coat to protect your design!

x


SHARE:

Friday, 30 December 2011

Manicure Ideas!

I love spending hours painting my nails, making them look all pretty & nice. There's nothing I enjoy more than sticking 50+ diamonties onto my little finger in neat little rows - only for them to fall off after 24hours.

Here are two I tried out recently!


I've found some really cute images of manicure ideas that consist of more than just diamonties and all things sparkly. Have a go!


Top Tip - If you struggle with nail pens and a steady hand, try nail stickers! They last for up to 10days and are really easy to apply!!


SHARE:

Thursday, 22 December 2011

Moustache Nails

Okay so I have a slight obsession with moustaches...
I want to try out this really cute manicure idea but can't find the moustache stickers ANYWHERE!
Looks like I'm going to have to practise my steady hand and use nail pens..


SHARE:
NEW IN MY WARDROBE

© FASHERNABLY LATE

This site uses cookies from Google to deliver its services - Click here for information.

Blogger Template Created by pipdig