Shop My Feed

Monday, 3 September 2012

Nail Art #12 - Paint Splatter

This nail tutorial is really easy to do & requires no tools other than just a straw, yes a straw! All you need is a base colour and 3 bright and complimenting colours for the design. This nail tutorial requires a little mess making, so make sure you have something to protect the surface our using from any flying polish!
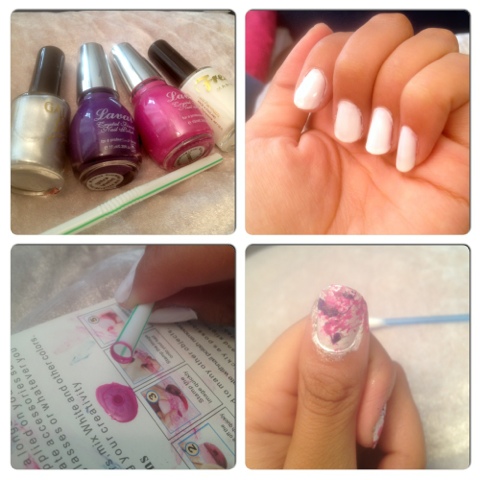


1. First take a basecoat and apply this to your nails to protect them.

2. Paint two coats of white polish onto your nails (or what base colour you choose)

3. This next section can get quite messy so lay down something to protect your surface, I used an old magazine.

4. Take your first chosen colour (I used purple for this) and paint a few dabs of colour onto the bottom of your straw, make sure you don't apply too much as this can cause huge blobs of colour on your nails. It's best to use just a small amount as you can build up to your desired effect as you go along.
5. Place your nail about 5cm away from the straw and blow into the straw. Short sharp bursts achieve the best results.

6. Continue this on all of your nails with your desired colours.

7. I used a silver at the end to add a slight sparkle to my design

8. Finish by using a topcoat to protect your design and add a beautiful shine!


Hopefully you didn't make too much mess whilst using this tutorial, but it really does achieve a great design! Please feel free to show me your own designs!


SHARE:

Thursday, 30 August 2012

Nail Art #11 - Zebra Stripes


This is a really easy and cute nail tutorial and it literally takes about 15 minutes! Animal prints for nail designs have been around for a while now, looks like people just can't get enough! I'm going to be telling you how to achieve this design using just a nail striper!

1.  Use a basecoat to protect your nails from the polish

2. Use a Matte polish as a base and apply two coats, if you can buy a matte topcoat and apply it over the top of any varnish to dull the shine if you don't have any matte polishes. (You don't have to use a matte polish, but the shine and contrast off the silver looks more dramatic)

3. To create the Zebra stripes I pulled up an image off Google to get the pattern correct. It's mainly just triangular patterns with lines inbetween.

4. Clean up around your nails using a cotton bud dipped in polish remover.

5. If you've used a Matte polish, don't add a topcoat or it will add a shine and detract away from the contrasting colours.


Experiment with all sorts of colours and animal prints! Using a Matte black polish and a black striper has a really cute and subtle effect!

INSTAGRAM: SABINASHER


SHARE:

Thursday, 12 April 2012

I love Organising


With my recent obsession with nail art recently, my collection of nail polishes have grown massively - so, it was only time to sort it all out and arrange it all nice and neatly as my little make up bag was overflowing and tearing at the seems. I remembered my sister had this cute little case which she never used so I stole it from her (with her knowledge of course). I can say I'm quite proud of how cute it looks!

I wish I had much more money than I do so I could buy all the Barry M, Gosh, O.P.I & Ciate colours in the world, but unfortunately my status of 'broke ass student' has not yet and will not change in the near future. But, saying that, my nail designs don't look too shoddy seeing as though most of my nail polishes are either Rimmel, a few Barry M's I purchased in the ASOS sale, Avon (which are amazing and I 100% recommend when they're on offer for £2.40 each) and a mixture of other smaller brands which I bought for about a £1, showing you that you don't always need the top brands to have amazing nails!

The bottom right image shows all my stripers (nail art pen) colours I own. I bought them off Ebay for around £12 for 24 colours - and they're amazing. Unlike the typical nail art pens which are more dominant around Ebay, these are just the striper without the pen as I've bought the pen/striper combo ones before and found the nips on the pens constantly clog up or just don't work at all!

I also bought the nail gems for £1 off Ebay - and some nail dotting tools for £1 (not photographed due to bad camera sorry). But you can make your own dotting tools from things around the house such as a bobby pin or tooth pick

Hope you like my nail polish collection - what's yours?


SHARE:

Friday, 30 December 2011

Manicure Ideas!

I love spending hours painting my nails, making them look all pretty & nice. There's nothing I enjoy more than sticking 50+ diamonties onto my little finger in neat little rows - only for them to fall off after 24hours.

Here are two I tried out recently!


I've found some really cute images of manicure ideas that consist of more than just diamonties and all things sparkly. Have a go!


Top Tip - If you struggle with nail pens and a steady hand, try nail stickers! They last for up to 10days and are really easy to apply!!


SHARE:

Thursday, 22 December 2011

Moustache Nails

Okay so I have a slight obsession with moustaches...
I want to try out this really cute manicure idea but can't find the moustache stickers ANYWHERE!
Looks like I'm going to have to practise my steady hand and use nail pens..


SHARE:
NEW IN MY WARDROBE

© FASHERNABLY LATE

This site uses cookies from Google to deliver its services - Click here for information.

Blogger Template Created by pipdig